AEM doesn’t support the move option for bulk selection of pages. Hence, there is a need to find a way to bulk move pages from one location to another location and update their references.
Requirement:
This article discusses the problem of bulk moving pages from one location to another location in Adobe Experience Manager (AEM) and introduces the MCP Renovator process as a solution. It also provides step-by-step instructions on how to use an Excel sheet and the Renovator process to move pages, update references, deactivate and delete moved pages, and publish moved references and pages.
Bulk move some of the pages from one location to another location
Update the references on the page.
Deactivate moved pages and delete
Publish moved references
Publish moved pages
Introduction:
Out of the box, AEM doesn’t support the move option/operation for more than one selection of pages. However, we can use the MCP renovator process to bulk move the existing pages from one location to another location.
Create an Excel sheet containing the following columns:
Source – source path of the page
Destination – destination path and if you want to rename the page you do as well
In the above example, the magazine page will be renamed to revenue
Go to the MCP process path http://{domain}}/apps/acs-commons/content/manage-controlled-processes.html, select Renovator process upload the Excel sheet and use the following options as per your needs. If you select replication MCP queue will activate only references but won’t activate the moved pages.
Renovator process
Dry run the process to validate for any errors in the Excel sheet and select the detailed report to view complete move-related changes.
Renovator satisfy all 5 requirements but for the 6th requirement, you can use the below process to activate all the moved pages and you upload the same excel sheet and below process will only look into the destination column AEM Publish / UnPublish / Delete List of pages – MCP Process
How can I update an existing template with a new template without moving child pages or reactivation it?
Requirement:
This article discusses how to update an existing template with a new template in AEM without moving child pages or reactivation. The article provides two methods to achieve this goal: a manual method and a programmatic method. The programmatic method uses Manage Controlled Processes (MCP), which is both a dashboard and a rich API for defining complex tasks as process definitions. The article provides a step-by-step guide to updating the template type programmatically.
Update the Adventures page template from the landing page template to the Adventure page template.
Avoid moving child pages from the current adventure page to the new staging location
Avoid bulk activation of child pages due to movement
Create duplicate page
Introduction:
Let’s try to solve the above issue manually:
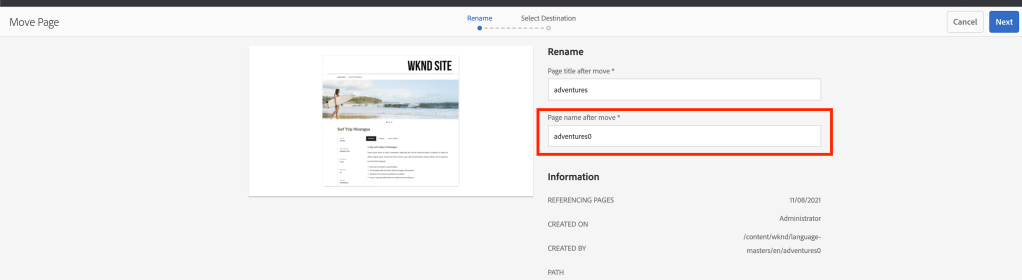
Create a new page called adventures (which will be created as adventures0) using the adventure page template.
Copy all the child pages or move page by page from the current adventures page to the new adventure page.
Copy the child pages from source to destination
Delete the current adventures page and move the adventures0 page and rename it by removing the 0
Move the page and rename
Finally, click on manage publication to publish the new adventures page and select all child pages to reactivate.
Include child pages before publishing
Let’s try to solve the above issue programmatically:
MCP (Manage Controlled Processes) is both a dashboard for performing complex tasks and a rich API for defining these tasks as process definitions. In addition to kicking off new processes, users can also monitor running tasks, retrieve information about completed tasks, halt work, and so on.
Add the following maven dependency to your pom to extend MCP
With increasing security and safety concerns, AEM Groovy Console is not allowed to be installed in the author/publish environment in Production. As a result, users require an alternative tool to execute short scripts for content updates.
Requirement:
The Groovy Console has been a preferred tool for executing short scripts for content updates in Adobe Experience Manager (AEM), but due to security and safety concerns, the console is not installed in the author/publish environment in Production. This article explores using the ACS Commons Managed Control Process (MCP) as a better alternative for running bulk updates with the provided console. It provides an introduction to MCP and explains how to extend it in a current project structure and make relevant POM changes. It also covers tools that come out of the box with MCP, how to use and maintain them, and how to create a new process and form fields with MCP.
Extend MCP in your current project structure and add the relevant POM changes
Introduction:
MCP (Manage Controlled Processes) is both a dashboard for performing complex tasks and also a rich API for defining these tasks as process definitions. In addition to kicking off new processes, users can also monitor running tasks, retrieve information about completed tasks, halt work, and so on.
The Groovy console is an awesome tool to write short scripts to execute some of the content updates but due to increase security and safety issues, the AMS team is not allowing to install Groovy Console in the author/publish environment in Production and there is no other way we can run the groovy console on pubs. Hence ACS Commons MCP would be the better replacement for running these kinds of bulk updates using the beautiful console provided by ACS Commons.
How to use MCP?
Process Manager: How to navigate and access ACS Commons MCP process manager
Tools: Tools that come to OOTB when you use MCP tools
Operations: How to use and maintain the MCP process
In order to extend the MCP process, create a separate module called MCP under your project directory and add the following dependencies as shown below:
Add the following code into all module pom.xml to embed this new module
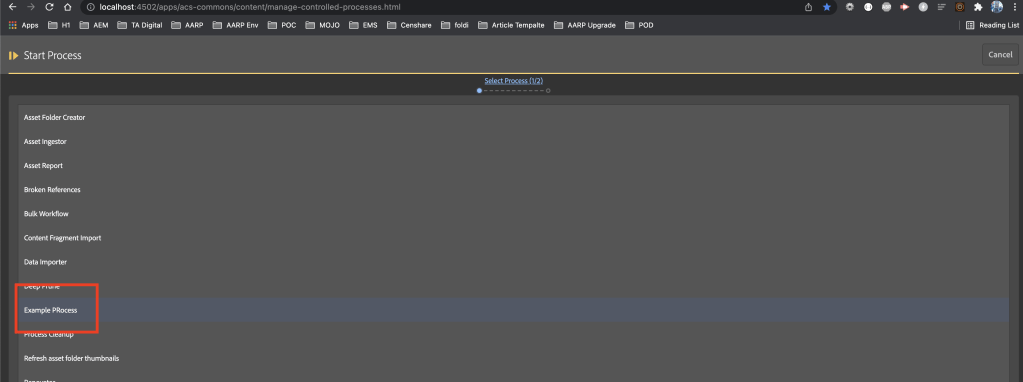
For the MCP process to pick up your new process, you need to create a service that implements ProcessDefinitionFactory and override the getName method to provide the process name to show under the list of processes.
MCP process list
createProcessDefinitionInstance to create a new instance of this process.
package com.mysite.mcp.process;

import org.osgi.service.component.annotations.Component;
import com.adobe.acs.commons.mcp.ProcessDefinitionFactory;

@Component(service = ProcessDefinitionFactory.class, immediate = true)
public class ExampleProcessFactory extends ProcessDefinitionFactory<ExampleProcess> {
	@Override
	public String getName() {
		return "Example PRocess";
	}
	@Override
	protected ExampleProcess createProcessDefinitionInstance() {
		return new ExampleProcess();
	}
}
You can learn more regarding process definition here
Create Process Implementation:
The process implementation class extends ProcessDefinition and you can have multiple form fields to accept the author’s input.